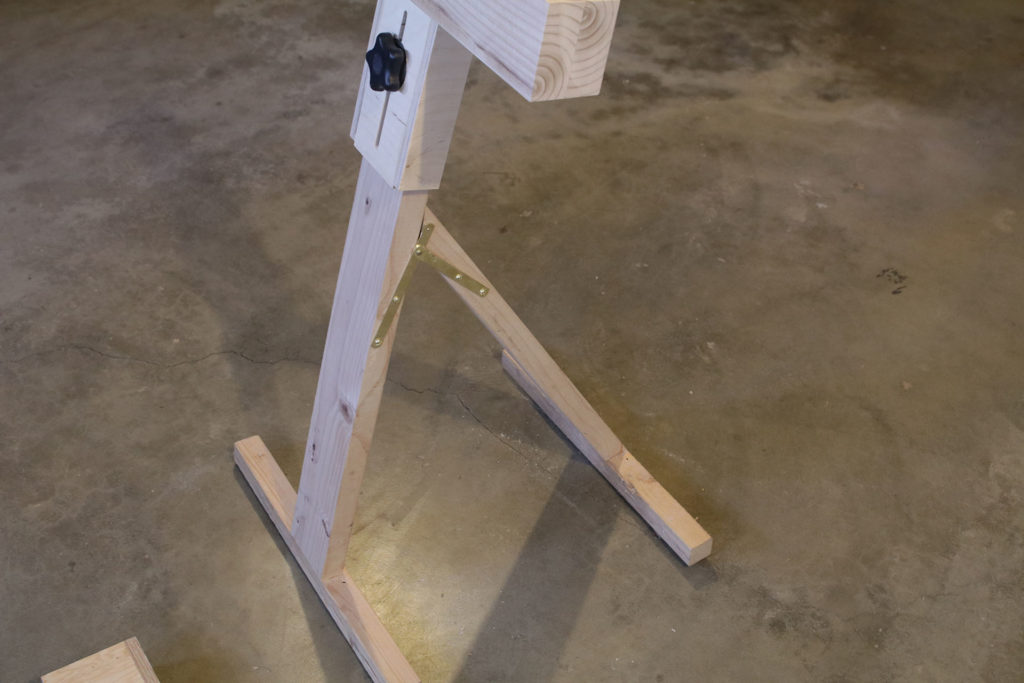
I needed help supporting my maple lumber when ripping it on the table saw. These were unsurfaced 8/4 boards (2″ thick), 9 to 12″ wide, and ten or eleven feet long. To rip these by myself, I needed something like this to support the board coming into the saw, and on the outfeed side. The outfeed side in my case for a board this long actually has to go out my open shop door, and down a step, so it needs to adjust to fit the saw height when sitting down a step. I needed something that would fold up for easier storage.
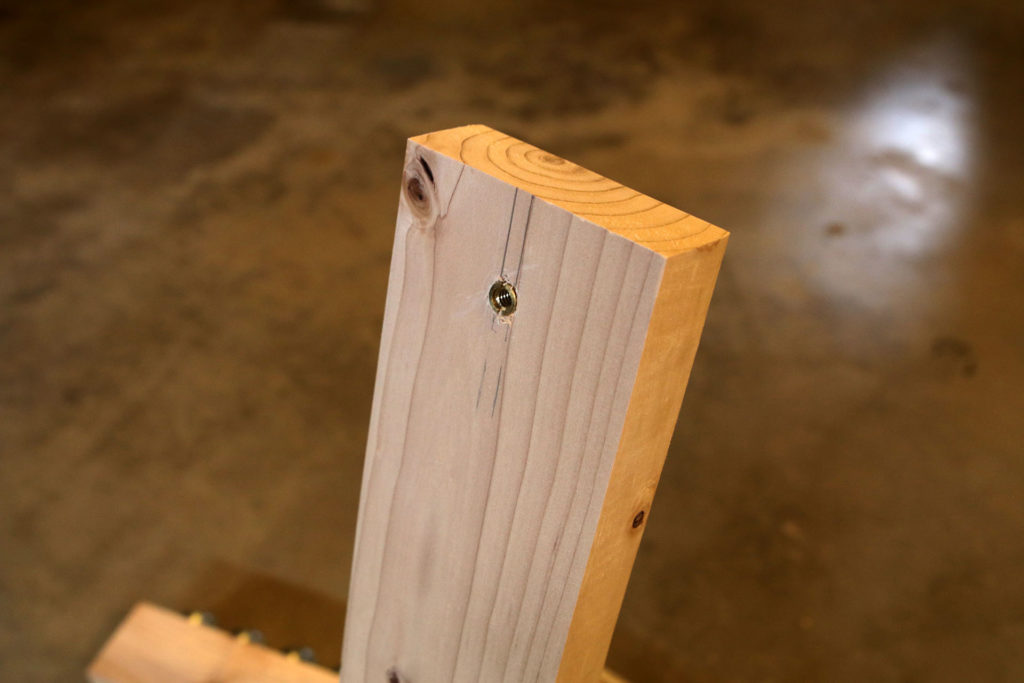
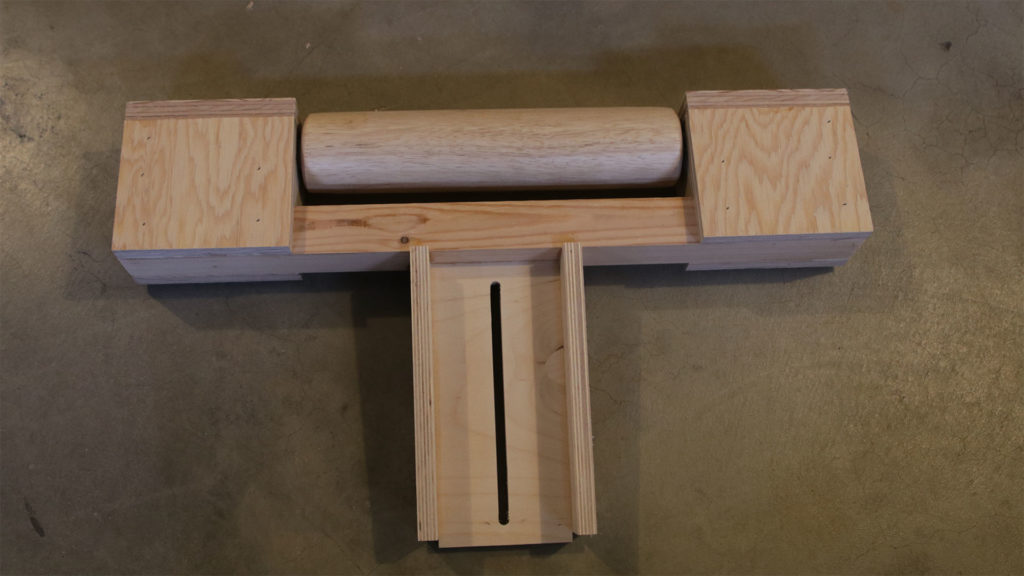
I just made this very simply out of 2×4’s, and a couple 2×2’s for the base that sits on the floor. The top piece comes off, and mounts with a knob with a bolt on it, that screw into a threaded insert on the stand. It has a U shaped piece that wraps around the 2×4, with a slot in it that the star knob with bolt goes thru to fit on the 2×4 base piece. I used some baltic birch for the three pieces making up the U shaped piece, and cut these so it fits snug on the base, but still slides up and down.
The first one I did was made a regular wooden rolling pins. I didn’t change the rolling pin at all, the handles are still inside the top part, although this created a small worry as the top of the box around the handle is close to the top of the roller pin, giving it little clearance, but it was enough not to be an issue.
The problem was when I tried using this. The very heavy maple board, as I pushed it thru the saw would move away from the fence. It was my first time ripping an expensive board like that, and using my roller stands. So I lowered the blade and did some tests runs, not cutting anything, just seeing how it slide thru, and watching how it stayed near the fence. Or in my case, the lack of it staying near the fence. Because the rolling pin wasn’t perpendicular exactly to the saw, it would make the board move away from the fence, and I couldn’t put enough pressure on the board to keep it on the fence. I tried many times to adjust the pin slightly differently, and it never made a difference.

Unfortunately that wasn’t going to work for me, so I decided to go with the roller balls. I used the same base, I just made a different top piece. The top piece is a couple 2×4’s glued together after I jointed and planed them. Then I just screwed on as many of the roller balls as I could, putting them close together as possible. My roller ball top holds 8 rollerballs, and is 17.5″ long and 2 and 5/8″ wide.
I did read one case where someone said these left compression lines on the wood which ended up in his finished projects. I didn’t have this issue, this was unsurfaced wood, which I later planed and jointed. I had only jointed one edge to get a better edge to make the first rip cut to.

When I tried the roller ball stands, it was easy to keep the large heavy board right up to the fence. I was then able to rip that huge board by myself with no other help.
I think the roller pin stands would work great for smaller boards that aren’t so heavy, as I’d be able to keep them up to the fence. Or for narrow boards that won’t fit well on the roller ball stands (maybe only hitting one ball), I can just use the rolling pin stand, since the head is adjustable.
If you know of other pluses or minuses to these two types of roller stands, please comment, and I will gather all those up into an update at the bottom of this article.
Parts used in this build:
Brass Table leg brace (1 pack for each stand) http://amzn.to/2FdoIKP
Set of 6 Roller balls: http://amzn.to/2oN5Bx4
Large star knobs: http://amzn.to/2tlGjul
1/4 – 20 threaded insert: http://amzn.to/2FZKte6
Rolling pin: http://amzn.to/2tkxAst
Big Tools I use:
Table Saw, SawStop PCS: <a href=”http://amzn.to/2H3ySLb”>http://amzn.to/2H3ySLb</a>
SawStop Industrial Mobile base: <a href=”http://amzn.to/2spo6f6″>http://amzn.to/2spo6f6</a>
Overarm dust collector: <a href=”http://amzn.to/2CdfRlR”>http://amzn.to/2CdfRlR</a>
SawStop 80 tooth blade: <a href=”http://amzn.to/2Cenngl”>http://amzn.to/2Cenngl</a>
SawStop 40 tooth blade: <a href=”http://amzn.to/2CdLRXh”>http://amzn.to/2CdLRXh</a>
SawStop Dado safety cartridge: <a href=”http://amzn.to/2H8e7ye”>http://amzn.to/2H8e7ye</a>
DeWalt Dado: <a href=”http://amzn.to/2CeqLrs”>http://amzn.to/2CeqLrs</a>
SawStop Cast Iron Extension: <a href=”http://amzn.to/2Cdtj9s”>http://amzn.to/2Cdtj9s</a>
Bench Dog Router Extension: <a href=”http://amzn.to/2Bpcbkr”>http://amzn.to/2Bpcbkr</a>
Router: <a href=”http://amzn.to/2H5YK9v”>http://amzn.to/2H5YK9v</a>
Router Lift: <a href=”http://amzn.to/2Ejz3En”>http://amzn.to/2Ejz3En</a>
Band Saw: <a href=”http://amzn.to/2Eh9pQG”>http://amzn.to/2Eh9pQG</a>
Smaller Tools I use:
DeWalt Drill/Driver set (very nice!): <a href=”http://amzn.to/2BpDMC7″>http://amzn.to/2BpDMC7</a>
Clamps: <a href=”http://amzn.to/2H6tG9t”>http://amzn.to/2H6tG9t</a>
Bessey REVO Clamps: <a href=”http://amzn.to/2CeGEOJ”>http://amzn.to/2CeGEOJ</a>
FastCap Glue Bottle: <a href=”http://amzn.to/2Cf25z5″>http://amzn.to/2Cf25z5</a>
Chisel set: <a href=”http://amzn.to/2EVBUAD”>http://amzn.to/2EVBUAD</a>
Brad point drill bits: <a href=”http://www.leevalley.com/us/wood/page.aspx?c=&p=42247&cat=1,180″>http://www.leevalley.com/us/wood/page.aspx?c=&p=42247&cat=1,180</a>
Forstner Bit Extension: <a href=”http://amzn.to/2CdxB0r”>http://amzn.to/2CdxB0r</a>
Bubble Level: <a href=”http://amzn.to/2Elvr50″>http://amzn.to/2Elvr50</a>
Sharpening Stones:
DMT 8″ Course (D8C): <a href=”http://amzn.to/2hZ8AOO”>http://amzn.to/2hZ8AOO</a>
DMT 8″ Fine (D8F): <a href=”http://amzn.to/2hY4tCT”>http://amzn.to/2hY4tCT</a>
DMT 8″ X Fine (D8E): <a href=”http://amzn.to/2Agtofq”>http://amzn.to/2Agtofq</a>
DMT 8″ XX Fine (D8EE): <a href=”http://amzn.to/2BwMziU”>http://amzn.to/2BwMziU</a>
Camera Equipment:
80D: <a href=”http://amzn.to/2EUq5KV”>http://amzn.to/2EUq5KV</a>
Lens: <a href=”http://amzn.to/2CdJKCs”>http://amzn.to/2CdJKCs</a>
GoPro: <a href=”http://amzn.to/2BnQa5h”>http://amzn.to/2BnQa5h</a>
Sandpaper:
3M 100: <a href=”http://amzn.to/2EiI94g”>http://amzn.to/2EiI94g</a>
3M 220: <a href=”http://amzn.to/2H8us5K”>http://amzn.to/2H8us5K</a>


Thank you for this insightful review. I am not up to the point of working with such large pieces of material however I am sure this information will come to mind when I do.
I hope it helps! I hadn’t used that large of boards before either, wow – those maple boards were heavy.