I’ve been following Christina Hunger’s Instagram posts and web page about her dog Stella and her board of buttons that enable her dog Stella to talk. It’s very incredible to see a real conversation between a dog and her owners. She’s using “Answer Buzzers” that you can get from Amazon, four buttons for $20 to $25. Each button can have a short phrase, or one word recorded on it, and Christina puts them on a piece of cardboard with a label near each one. Stella learns which buttons are what based on the position of the button on the board.
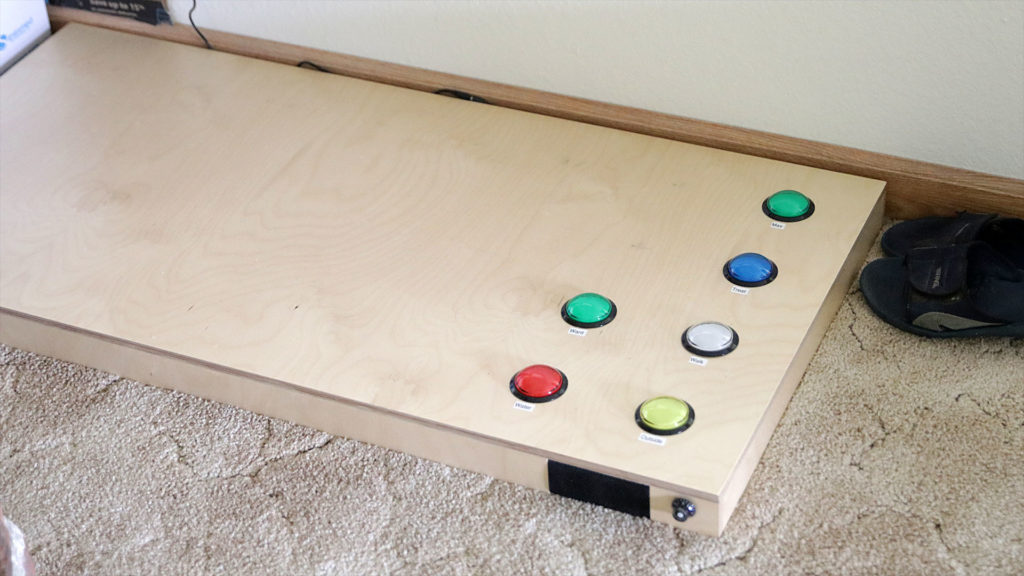
The same idea works for children with disabilities, or non-verbal children. I think this board would work for augmentative/alternative communication (AAC).
Make sure and check out my Youtube video of the board I built. Make sure and also watch Christina Hunger’s great videos on her Instagram of Stella using her buttons @hunger4words.
The buttons seemed expensive, given Christina has a lot of these on her board, over 36 of them at last count. Each of her buttons takes two AAA batteries, and the sound quality and volume didn’t seem that great based on the videos I watched. Although I haven’t had one in hand to try it myself. Some of the reviews do mention the Answer Buzzers are pretty quiet. I decided I wanted to try this with my dog, and since I’ve done some Arduino projects, I would use some cheaper buttons I found, five for for $13.
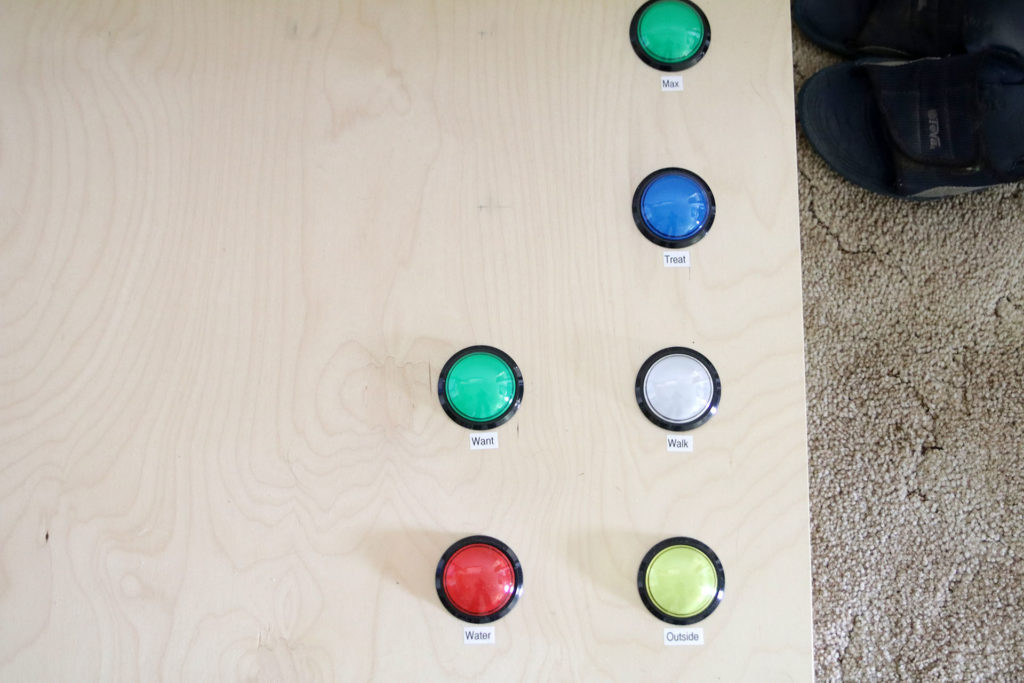
If you are interested in giving this a try, you can decide if you want to try the easier Answer Buzzer buttons, or the Arduino solution, which will take a bit more work to get going. My Arduino solution was cheaper considering how many buttons I may end up with. However, the price went from $25 to $20, making them a little cheaper. Still, Christina’s 36 buttons would be $180, plus all the batteries. My Arduino solution plugs in, and I could buy 40 buttons for $104, not including the board, Arduino and other parts. For me, I enjoyed the project of making the board, so I’m happy I went with the Arduino. I think I can do about 55 inputs with the Arduino Mega. If needed, I could add a second Arduino for another 55 inputs, and still use the same speakers and amplifier. I’d use one Arduino as the master and the second Arduino as a slave. The software doesn’t currently support that, but if someone wants to do that, let me know, and I can update the software.
If you decide to make my Arduino board, you can choose the button spacing you think would work for your dog. You can choose the size of the board and how many rows and columns of buttons your board will have. I decided to go with 4 buttons per column, and my board has 8 rows, for 32 buttons total, although I am starting with 6 buttons. I choose my spacing trying to guess how my large dog’s big paws would fit between the buttons. Since my buttons are quite tall, and wouldn’t just sit on a piece of cardboard, I used a half inch piece of plywood, 2 by 4 feet, and used sides of 2″ tall to allow of for the bottom part of the buttons and space to install the speakers and Arduino.
The buttons I found are lit by an LED when pressed, and are 60mm in diameter. I think the Answer Buzzers may be larger. The buttons I found seem to be made very well, come with extra LED’s and even and extra switch. The Answer Buzzer phrases are limited to 7 seconds each. With my Arduino solution, it just plays an mp3 file of whatever length you wish. The LED’s in the buttons I used are set up to work with 12 volts. Since the Arduino is 5 volts, this is less voltage, and still works great with the existing resistors inside the buttons.
My Arduino board has the advantages of just one set of speakers, and I record the audio onto a micro SDHC card that the Arduino can play the mp3 files from. My tiny amplifier board I use has a volume knob on it for variable volume. For as little as I paid, the sound quality is fairly high, I’m very pleased with it.
I’ll get into the details of how I built my board, and I will provide the software for the Arduino for free. Please use the parts list links at the bottom of this article, they are Amazon affiliate links, and using them will enable me to do other projects and articles like this in the future. Also, if you have any better ideas, or features for the software to have, please comment – I’m happy to make updates to the software to possibly have optional features people might want to have.
My software queues up the phrases to play, and plays a little pause between each phrase. You (or your dog) may press buttons faster than can be played, and they will be played in order, one at a time. Up to 5 phrases can be queued up to play. I didn’t think the dog would press buttons faster than that! If a button is held down, the phrase will be repeated every two seconds.
Put the mp3 phrases onto a micro SDHC in a folder named “01”. The first button’s phrase that starts with “001” the next, “002”, etc. You can put anything after those first the numbers, so I named my files “001-Walk.mp3”, “002-Outside.mp3” for example. When hooking up each button to an input pin on the Arduino, look at the switchPins array, and use the first number as the first pin (currently pin 22), etc.
I used my phone to record mp3 files for each word (or phrase) that you want each button to play. I recorded these at 48KHz, the highest sampling rate the MP3 player can support, for higher quality playback. Then I moved the mp3’s to my computer and used the free program Audacity to edit the sound file, and cut off any silence before and after the word or phrase. I recorded in mono, although with two speakers, the sound will play in stereo.
I used Baltic birch plywood, half a inch thick. You may use whatever type plywood you desire, make sure it will support your dog’s weight. It is best to buy the plywood locally. I also used three coats of poly-acrylic finish on it, that way I can wipe off dirt easily to help keep the board clean. My board is 24″ by 48″ with 2″ tall sides, so 2.5″ tall total with the top board on top of the sides. I just used wood glue to put it together. I left about 2″ from the edges before the start of each button and about 3″ between each button. Depending on your dog, you could even use a thinner plywood. Make sure you leave enough room for the button to fit under the board.
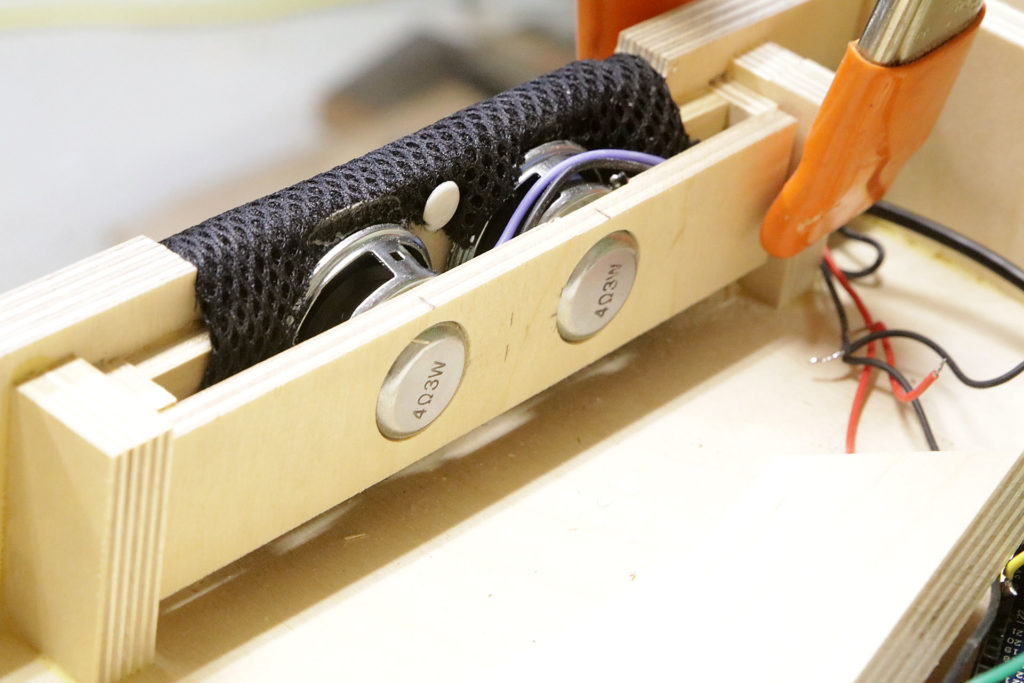
Before putting the sides onto the main board, I drilled and cut one of the longer sides to fit the speakers and amplifier with volume knob. My half inch plywood was too think to fit the amplifier volume knob, so I had to cut out a notch on the inside and I drilled a hole for the volume knob, then from the inside drilled a larger hole partway thru so the amplifier partially fits into the side board enough so that the threads stick through and I can fit a nut on the threads on the outside. This was a little tricky, make sure you don’t cut the larger hole or notch too deep – you don’t want to go entirely through the side, just enough to be able to fit the amplifier partway into the board and see the threads. I had to go pretty deep, and just leave a thin piece of the plywood on the outside.
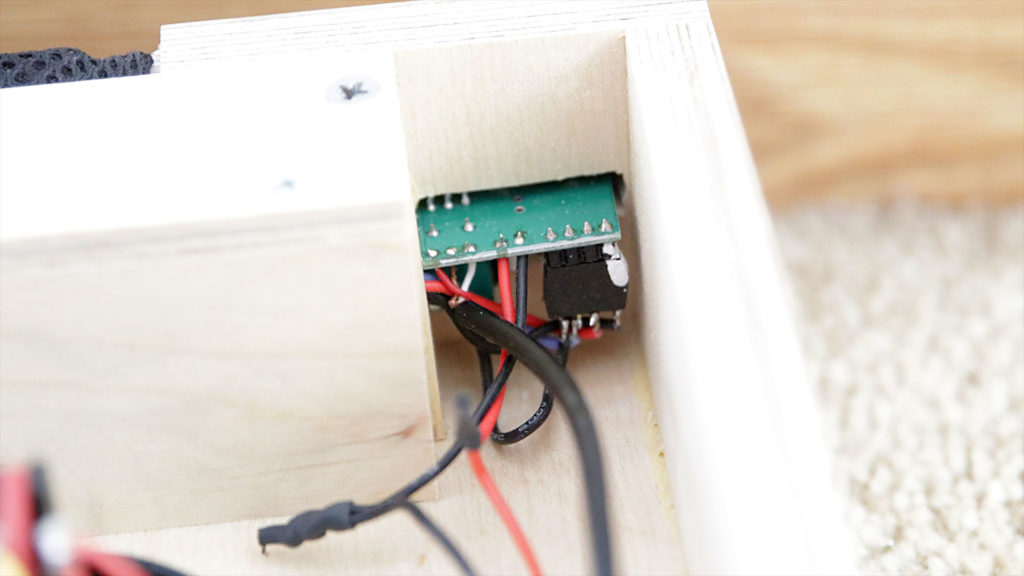
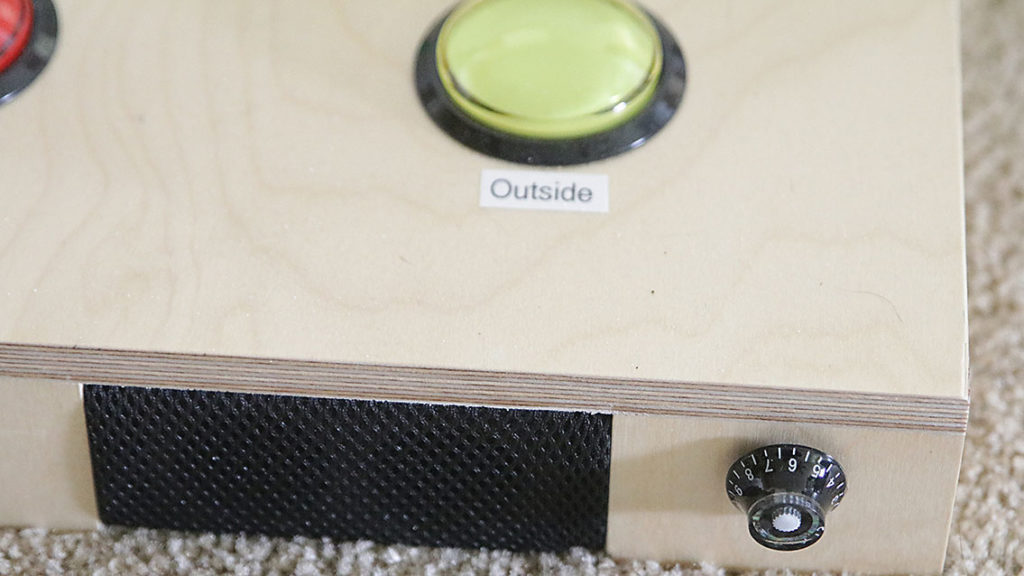
I drilled two larger holes for my speakers, and then I cut down the top and bottom of the side and the front with my table saw, thinning it enough to leave room for some speaker cloth. I used the table saw to do this, you may have to improvise, depending on what tools you have.
My specific measurements for the center of each button hole is from each long side, 3.75″ for the first row, 9.25″ for the second row, and 14.75″ for the third row and 20.25″ for the last row. For each of the eight columns of buttons, here’s the spacing I used for my large dog: 3.75″, 9 9/16″, 15 3/8″, 21 3/16″, 27″, 32 13/16″, 38 5/8″, 44 7/16″. Your spacing may differ if you put the buttons closer together, do a different grid other than 4 x 8, etc. Just make sure the button spacing is consistent and there’s enough room between the buttons. I used a hole saw to drill 2 1/4″ holes into the board. Before you drill – double and triple check the spacing!
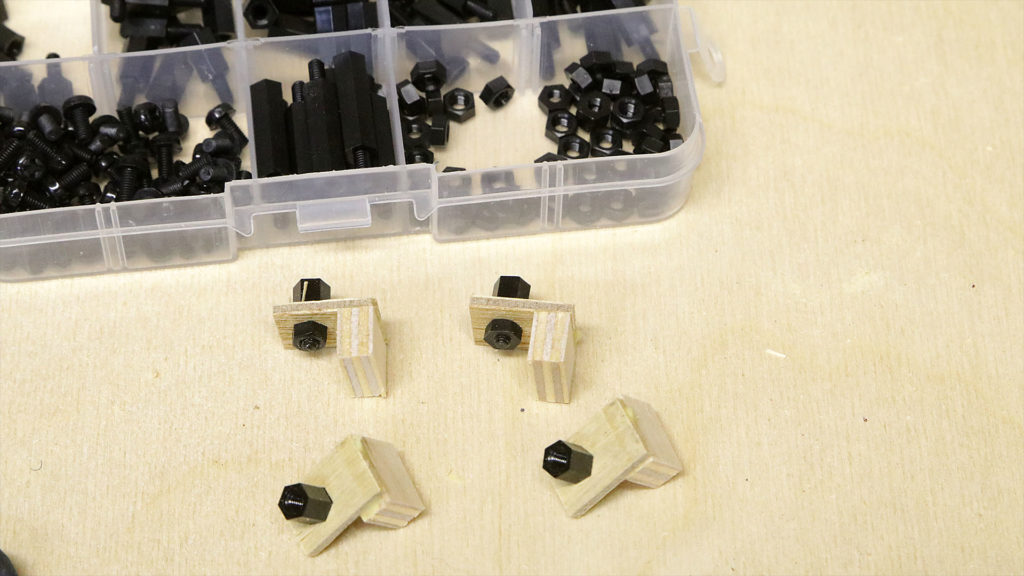
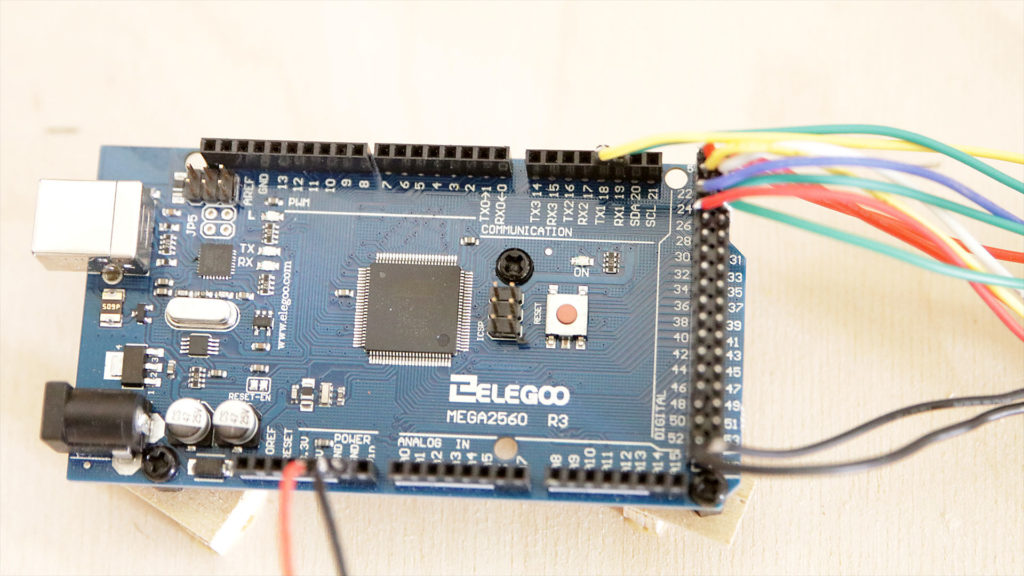
I made some little brackets out of thin plywood to hold the Arduino to the underside of the board. I put the Arduino close to the center of the board. Make sure you mount this in a place where future buttons won’t be, as I didn’t mount all my buttons. I thought my dog would get it easier if I started with less buttons, and added them as we go. I used some plastic standoff’s attached to my little plywood L shaped brackets, and screw them onto the Arduino. Then I put glue on the bottom of the plywood brackets and glued the Arduino down with the brackets. Mounting the brackets to the Arduino then gluing them down ensures that the brackets are mounted in perfect position so the holes in the Arduino fit right.
I added little 2″ tall boards into the middle of the board to help support the weight of the dog when pressing the buttons. Or me if I accidentally put too much weight on the board while pressing a button with my foot.
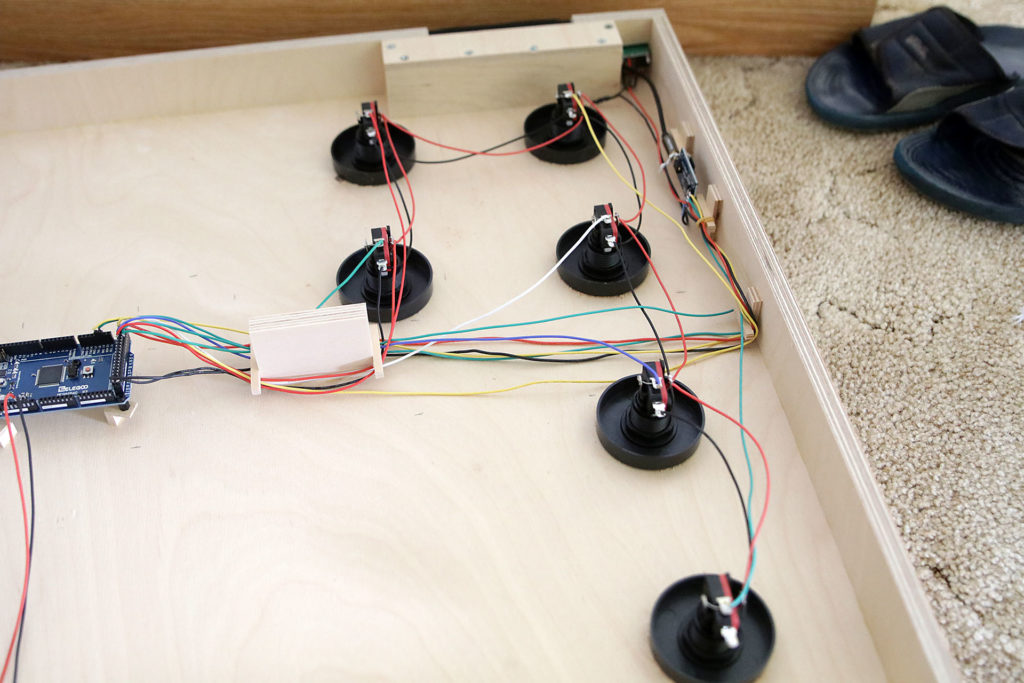
Each button needs a ground wire going to it. Since each Arduino input is using the internal pullup resistor, when pushing a button, we need the other side of the switch connected to ground. You can daisy chain the ground wire from switch to switch, but each button will need a separate input wire going back to the Arduino. I also ran a 5 volt power wire to each button, this is used to light up the LED when the button is pressed down. Hook the 5 volt power wire to the red side of each button switch. If the LED doesn’t light up, pop off the switch with a counterclockwise small twist, then reverse the LED in the holder. Put the switch back in the button with a small clockwise twist and try it again. The input wire to each switch goes to the top connector on the switch (when viewed upside down) and also to the black side of the switch. The connectors on the sides of the switch (which point up), on the red side, and on the opposing black side are for the LED only. The actual switch connectors are on top and the narrow side of the switch and face horizontally when mounted on a board going on the floor.
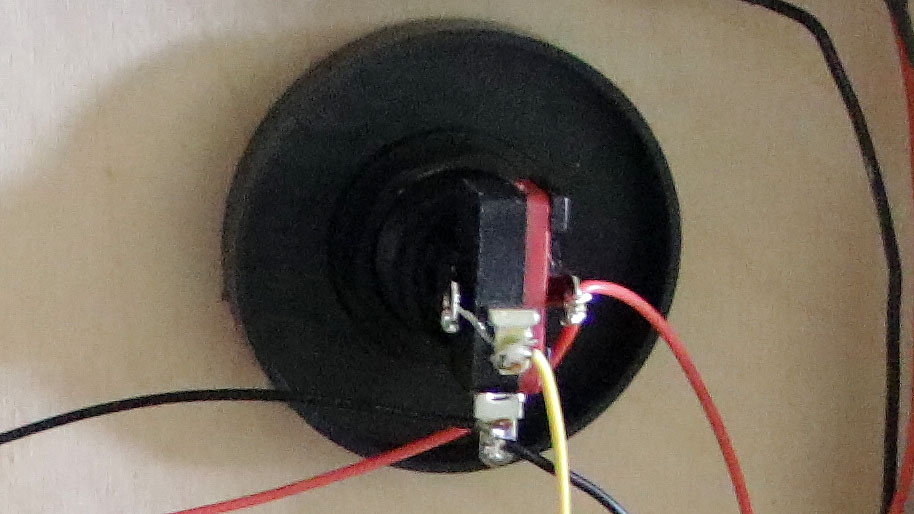
I used a silicone coated wire I found on Amazon, I like this wire a lot, the insulation won’t burn if you accidentally get the soldering iron up against it. I tried to use color coordinated wires for the different colored buttons, for the actual input signal from the button switch. I soldered most of my wires. I did use some headers to go into the Arduino, and soldered the wires to the headers. This makes it easy to change out the Arduino board if something goes wrong with it.
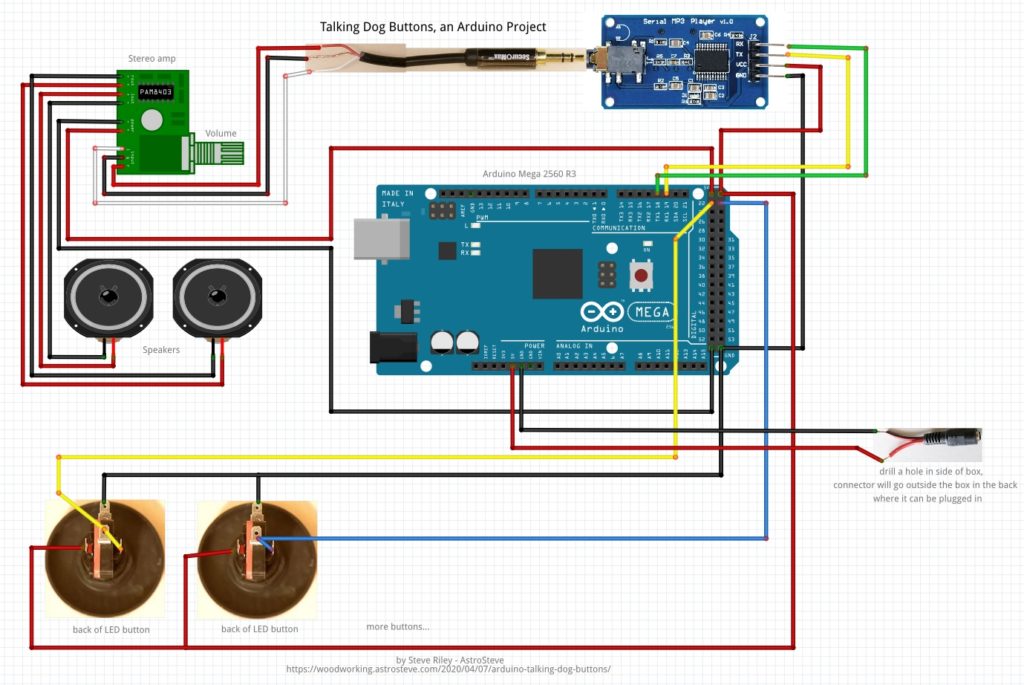
I used a headphone wire extension to plug into the MP3 board and go the the amplifier. I just cut the extension wire in half, and soldered one end to the amplifier, and plugged the other end into the jack on the MP3 board.
I used a wired female connector that matches the power input on the Arduino, and plugged the 5 volt power supply into this connector, which comes out the side in the back of the button board. This way I can plug in the power without lifting the board up. With a 5 volt power supply, you cannot use the plug on the Arduino board, this is for a higher voltage power supply that uses the internal 5 volt regulator. With a 5 volt power supply, you need to hook the power into the 5 volt line on the Arduino directly as seen on the breadboard.
After programming the mp3 files and copying them to the SDHC memory card, I inserted that card, then made labels for the buttons so I’d know which button was which. I plugged the board into the wall, and the buttons each flash in sequence as part of the startup sequence. The Arduino builtin LED will turn on whenever a button is pressed. You can use this to possibly help figure out a problem.
Now you need to program the Arduino. You need to download the Arduino IDE. I won’t give explanations for this, there are tons of articles everywhere, and it depends if you are on a Windows or Apple computer. You will need to grab a copy of the MP3 player library and edit the src/MD_YX5300.h file, and change USE_SOFTWARESERIAL from 1 to 0 and change _Serial from Serial2 to Serial1. Here’s the original text from MD_YX5300.h:
#pragma once
#include <Arduino.h>

#ifndef SOFTWARESERIAL
#define USE_SOFTWARESERIAL 1   ///< Set to 1 to use SoftwareSerial library, 0 for native serial port
#endif
#ifndef USE_CHECKSUM
#define USE_CHECKSUM       1   ///< Set to 1 to enable checksums in messages, 0 to disable
#endif

#if USE_SOFTWARESERIAL
#include <SoftwareSerial.h>
#else
#define _Serial Serial2      ///< Native serial port - can be changed to suit
#endif
Now change the two lines at the top as follows:
#pragma once
#include <Arduino.h>

#ifndef SOFTWARESERIAL
#define USE_SOFTWARESERIAL 0   ///< Set to 1 to use SoftwareSerial library, 0 for native serial port
#endif
#ifndef USE_CHECKSUM
#define USE_CHECKSUM       1   ///< Set to 1 to enable checksums in messages, 0 to disable
#endif

#if USE_SOFTWARESERIAL
#include <SoftwareSerial.h>
#else
#define _Serial Serial1      ///< Native serial port - can be changed to suit
#endif
Here is the main code for the sketch:
/*
    Name:       TalkingDogButtons.ino
    Created:	1/4/2020 3:03:07 PM
    Author:     Steve Riley

	This is a project to make talking buttons, like HungerForWords has done for her dog Stella.
	While not my idea, this is a copy of the idea, using the Arduino instead of "Answer Buzzers".
	The Arduino may be cheaper than 4 buttons for $25, depending on the number of buttons you add.
	No loads of AAA batteries (2 per button), no reprogramming buttons and the somewhat bad recording
	quality of Answer Buzzers. Phrases will be stored on a micro SDHC card and played when a button is hit.

	The sound is played by a mp3 module, the YX5300. You will record your audio clips as mp3's and store
	them onto an SDHC card. Store all thing audio in a folder called "01", and then each word or phrase
	should start with a 3 digit number such as "001-outside", "002-treat", "003-walk", etc. Phrase 001 will
	be played when the first button is pressed in the switchPins array, Phrase 002 will be played when the
	second input in the switchPins array is pressed, etc.

	VERSIONS:
	1.0  3/25/2020 Initial version

	Copyright 2020 by Steve Riley
	You may use this software and modify it to use for yourself for personnal or commercial use inside
	your business. If you wish to sell the software or units programmed with this software, please
	contact me.
*/
// Grab a copy of the library here: https://github.com/MajicDesigns/MD_YX5300
// And copy it to your Arduino/libraries folder. So you should have a MD_YX5300-master folder in the
// libraries folder, MAKE SURE you edit the one file, read below:
#include <MD_YX5300.h>

// Connections for serial interface to the YX5300 module
// IMPORTANT: !!!!!!!!!!!!!!!
// You WILL need to change the libraries/MD_YX5300-master/src/MD_YX5300.h file.
// Change the USE_SOFTWARESERIAL to 0  (ie: #define USE_SOFTWARESERIAL 0   ///< Set to 1 to use SoftwareSerial library, 0 for native serial port)
// Change _Serial to Serial1 (ie: #define _Serial Serial1      ///< Native serial port - can be changed to suit)
// The two lines below aren't used I don't think (since we are using hardware serial)
const uint8_t ARDUINO_RX = 19;    // connect to TX of MP3 Player module
const uint8_t ARDUINO_TX = 18;    // connect to RX of MP3 Player module

// How many buttons you are using. You can set this exact to reduce looking at unused buttons, or
// set it to a reasonable number higher, such as 25, 30, or 40 to avoid having to reprogram your
// Arduino every time you add buttons. Alternatively, you could set it to the max size of switchPins[]
// array, currently 55
const byte buttons_used = 6;

//--------------------------------------------------------------------------
// You should not need to change anything below this line...................
//--------------------------------------------------------------------------

#define DEBUG 0		// set to 0 to not compile in Serial.print statements

// Streaming shortcut for Serial.print statements.
template<class T> inline Print& operator <<(Print& obj, T arg) { obj.print(arg); return obj; }

// Define global variables
MD_YX5300 mp3(ARDUINO_RX, ARDUINO_TX);
bool bUseCallback = false; // use callbacks?
bool bUseSynch = false;   // use synchronous?


// Define User Types below here or use a .h file
//
char const LF[] = "\n";

// POSSIBLE WORDS TO USE:
// Outside, Inside, Yes, No, Eat, Water, Bye, Walk, People's names, dog's name, good, help, Come, Play, Look,
// Want, where, all done, bed, happy, mad, Later, Ball, Hi, Now,


// There are more pins we can use for input. If you need more, I can add more to the array, or you can.
// The following pins are for the Arduino Mega only. If you use a different Arduino, you will have to determine which
// pins will work for that particular Arduino.
// I am avoiding using communications pins, and SPI pins for now. If you use any other pins, remove that number from the
// switchPins array so it won't be used for a button.
uint8_t switchPins[] = { 22, 23, 24, 25, 26, 27, 28, 29, 30, 31, 32, 33, 34, 35, 36, 37, 38, 39, 40, 41, 42, 43, 44, 45, 46, 47, 48, 49,
	A0, A1, A2, A3, A4, A5, A6, A7, A8, A9, A10, A11, A12, A13, A14, A15, 2, 3, 4, 5, 6, 7, 8, 9, 10, 11, 12 };

const byte pinCount = sizeof(switchPins) / sizeof(byte);
byte lastButtonState[pinCount];		// the debounced state of the button
byte currentState[pinCount];		// current state of buttons, not debounced yet
unsigned long lastDebounceTime[pinCount];
const unsigned long debounceDelay = 60;		// button must be pressed this many milliseconds before being seen as "off" or "on"


// Variables to help control the playing of buttons. Since playing a button, if one is already playing, cuts off the currently
// playing recording, I will buffer these up and play them with a small delay between phrases. I don't know a dog would ever press them that fast,
// but maybe if someone has longer phrases. Or maybe if a human is using this as an AAC device.
bool mp3_Playing = false;
bool mp3_indelay = false;	// if delaying between words
unsigned long delaystart;
byte btn_queue[5];			// queue of buttons pressed we still need to play. Next btn always at zero index
const unsigned long betweenWordsTime = 100;		// amount of milliseconds to pause between phrases


// Define Function Prototypes that use User Types below here or use a .h file
//


// Define Functions below here or use other .ino or cpp files
//
void playPhrase(byte thisPin) {
	// Keep a short list of phrase we need to say still, queue them up if buttons are pressed faster than it can say them
	// find first empty spot, and add this one to the queue.
	for (byte i = 0; i < sizeof(btn_queue) / sizeof(byte); i++) {
		if (btn_queue[i] == 255) {
			btn_queue[i] = thisPin;
#if DEBUG == 1
			Serial << "Queue added at index " << i << " thisPin = " << thisPin << LF;
#endif
			break;	// exit loop, we added it the the queue
		}
	}

	return;

}

void checkPhraseQueue() {

	if (!mp3_Playing && mp3_indelay) {
		// we are in delay, is it time to end pause between pharses?
		//Serial << "In delay millis=" << millis() << " delaystart = " << delaystart << LF;
		if (millis() - delaystart > betweenWordsTime) {
			mp3_indelay = false;
#if DEBUG == 1
			Serial << "Out of Pause" << LF;
#endif
		}
	}
	if (!mp3_Playing && !mp3_indelay) {
		// see if there's something we need to play
		// Serial << "Queue spot 0 = " << btn_queue[0] << LF;
		if (btn_queue[0] != 255) {
			uint8_t fldr = 1;
			uint8_t file = btn_queue[0] + 1;
			mp3.playSpecific(fldr, file);
			mp3_Playing = true;

#if DEBUG == 1
			Serial << "Playing " << btn_queue[0] + 1 << LF;
#endif
			//delay(2000);
			for (byte i = 1; i < sizeof(btn_queue) / sizeof(byte); i++) {
#if DEBUG == 1
				Serial << "Moving down index " << i << LF;
#endif
				btn_queue[i - 1] = btn_queue[i];
			}
#if DEBUG == 1
			Serial << "Clearing spot " << sizeof(btn_queue) / sizeof(byte) - 1 << LF;
#endif
			btn_queue[(sizeof(btn_queue) / sizeof(byte)) - 1] = 255;

#if DEBUG == 1
			Serial << "Queue = ";
#endif
			for (byte i = 0; i < sizeof(btn_queue) / sizeof(byte); i++) {
#if DEBUG == 1
				Serial << btn_queue[i] << " ";
#endif
			}
#if DEBUG == 1
			Serial << LF;
#endif
		}
	}
	return;
}


void cbResponse(const MD_YX5300::cbData* status)
// Used to process device responses either as a library callback function
// or called locally when not in callback mode.
{
#if DEBUG == 1
	if (bUseSynch)
		Serial.print(F("\nSync Status: "));
	else
		Serial.print(F("\nCback status: "));
#endif

	switch (status->code)
	{
	case MD_YX5300::STS_OK:         Serial.print(F("STS_OK"));         break;
	case MD_YX5300::STS_TIMEOUT:
		Serial.print(F("STS_TIMEOUT"));
		// something went wrong, reset playing status nd queue
		mp3_Playing = false;
		mp3_indelay = false;
		for (byte i = 0; i < sizeof(btn_queue) / sizeof(byte); i++) {
			btn_queue[i] = 255;
		}
		//mp3.reset();	// reset device
		delay(700);
		break;
	case MD_YX5300::STS_VERSION:    Serial.print(F("STS_VERSION"));    break;
	case MD_YX5300::STS_CHECKSUM:   Serial.print(F("STS_CHECKSUM"));    break;
	case MD_YX5300::STS_TF_INSERT:  Serial.print(F("STS_TF_INSERT"));  break;
	case MD_YX5300::STS_TF_REMOVE:  Serial.print(F("STS_TF_REMOVE"));  break;
	case MD_YX5300::STS_ERR_FILE:   Serial.print(F("STS_ERR_FILE"));   break;
	case MD_YX5300::STS_ACK_OK:     Serial.print(F("STS_ACK_OK"));     break;
	case MD_YX5300::STS_FILE_END:
		Serial.print(F("STS_FILE_END"));
		// Mark playing as done, and start of pause between phrases
		if (mp3_Playing) {
			mp3_Playing = false;
			mp3_indelay = true;
#if DEBUG == 1
			Serial << "In pause" << LF;
#endif
			delaystart = millis();
		}
		break;
	case MD_YX5300::STS_INIT:       Serial.print(F("STS_INIT"));       break;
	case MD_YX5300::STS_STATUS:     Serial.print(F("STS_STATUS"));     break;
	case MD_YX5300::STS_EQUALIZER:  Serial.print(F("STS_EQUALIZER"));  break;
	case MD_YX5300::STS_VOLUME:     Serial.print(F("STS_VOLUME"));     break;
	case MD_YX5300::STS_TOT_FILES:  Serial.print(F("STS_TOT_FILES"));  break;
	case MD_YX5300::STS_PLAYING:    Serial.print(F("STS_PLAYING"));    break;
	case MD_YX5300::STS_FLDR_FILES: Serial.print(F("STS_FLDR_FILES")); break;
	case MD_YX5300::STS_TOT_FLDR:   Serial.print(F("STS_TOT_FLDR"));   break;
	default: Serial.print(F("STS_??? 0x")); Serial.print(status->code, HEX); break;
	}

#if DEBUG == 1
	Serial.print(F(", 0x"));
	Serial.print(status->data, HEX);
	Serial << "\n";
#endif
}

void setCallbackMode(bool b)
{
	bUseCallback = b;
#if DEBUG == 1
	Serial.print(F("\n>Callback "));
	Serial.print(b ? F("ON") : F("OFF"));
	Serial << LF;
#endif
	mp3.setCallback(b ? cbResponse : nullptr);
}

void setSynchMode(bool b)
{
	bUseSynch = b;
#if DEBUG == 1
	Serial.print(F("\n>Synchronous "));
	Serial.print(b ? F("ON") : F("OFF"));
	Serial << LF;
#endif
	mp3.setSynchronous(b);
}


// The setup() function runs once each time the micro-controller starts
void setup()
{
#if DEBUG == 1
	Serial.begin(115200);
#endif

	// intialize all input pins that are hooked to buttons
	for (byte thisPin = 0; thisPin < pinCount && thisPin < buttons_used; thisPin++) {
		pinMode(switchPins[thisPin], INPUT_PULLUP);		// use internal pull up resistors
		lastButtonState[thisPin] = HIGH;			// assume all buttons are not pressed at the start
		lastDebounceTime[thisPin] = millis();	// init last pressed time for all buttons
	}

	mp3.begin();

	setCallbackMode(bUseCallback);
	setSynchMode(bUseSynch);

	// Run thru and flash each button as a test?
	for (byte thisPin = 0; thisPin < pinCount && thisPin < buttons_used; thisPin++) {
		pinMode(switchPins[thisPin], OUTPUT);
		digitalWrite(switchPins[thisPin], LOW);
		delay(150);
		digitalWrite(switchPins[thisPin], HIGH);
		pinMode(switchPins[thisPin], INPUT_PULLUP);	// put back to input again
		delay(100);
	}

	mp3.volume(mp3.volumeMax());	// Set volume to maximum
	mp3.setTimeout(1200);
	mp3.queryFilesCount();

	for (byte i = 0; i < sizeof(btn_queue) / sizeof(byte); i++) {
		btn_queue[i] = 255;	// initialize button queue (what buttons are waiting to be played), 255 is nothing
	}

	pinMode(LED_BUILTIN, OUTPUT);	// set internal LED to output
	digitalWrite(LED_BUILTIN, LOW);	// turn off internal LED
}

// Add the main program code into the continuous loop() function
void loop()
{
	byte internalLED = LOW;
	for (byte thisPin = 0; thisPin < pinCount && thisPin < buttons_used; thisPin++) {
		// Check for button action
		int reading = digitalRead(switchPins[thisPin]);		// read next button
		// If the switch changed, due to noise or pressing:
		if (reading != lastButtonState[thisPin]) {
			// reset the debouncing timer
			lastDebounceTime[thisPin] = millis();
#if DEBUG == 1
			Serial << "reading = " << reading << "\n";
			Serial << "millis() = " << millis() << "  lastBounceTime=" << lastDebounceTime[thisPin] << "\n";
#endif
		}
		if ((millis() - lastDebounceTime[thisPin]) > debounceDelay) {
			//Serial << "debounced millis() = " << millis() << "  lastBounceTime=" << lastDebounceTime[thisPin] << "\n";
			// whatever the reading is at, it's been there for longer than the debounce
			// delay, so take it as the actual current state:

			// if the button state has changed:
			if (reading != currentState[thisPin]) {
#if DEBUG == 1
				Serial << "CSC\n";
#endif
				currentState[thisPin] = reading;

				// only set to play mp3 phrase if the new button state is LOW (button pressed)
				if (currentState[thisPin] == LOW) {
					// Set to play a new phrase
					playPhrase(thisPin);
				}
			}
			else {
				// if the button is held down, repeat phrase every two seconds
				if (currentState[thisPin] == LOW && (millis() - lastDebounceTime[thisPin]) > 2000) {
					lastDebounceTime[thisPin] = millis();
					playPhrase(thisPin);	// play same phrase again
				}
			}
		}
		if (reading == LOW) {
			internalLED = HIGH;	// turn on internal LED if any of the buttons is pressed
		}
		lastButtonState[thisPin] = reading;

	}
	digitalWrite(LED_BUILTIN, internalLED);	// turn on or off the internal LED, ON if any button is pressed, OFF if no button is pressed

	//mp3.check();
	if (mp3.check()) {		// if returns true, a getStatus() call will then return the status of the msg
#if DEBUG == 1
		Serial << "Calling cbResponse()\n";
#endif
	//	uint8_t t = mp3.getStsCode();
	//	if (t != 0) {
	//		Serial << "t = " << t << "\n";
			cbResponse(mp3.getStatus());	// use getStatus() if no callbacks, and we're polling the status
	}

	//}

	checkPhraseQueue();
	delay(10);	// sleep for so many milliseconds
}
The big finish – what did my dog think? I should have filmed it. He came over and was very interested. My dog sometimes acts more like a cat, and will sometimes just turn around and walk off when I’m calling him, so to get his interest, I thought was great. He really looked at what I was doing for a good 30 to 60 seconds. Since that time in the last few days, not so much. While he certainly hears the words, I can hardly get him to come over to the board. A couple times he has, once when I was giving him treats. And he did give the board some good looking over again.
My dog is getting pretty old, and sadly has some huge health issues. He isn’t going to have a lot of time to learn the board. The good thing is, he knows all the words already. I’ll update if I can get him to press a button. Since I’m using “walk” and “treat”, there’s a couple of good incentives to pay attention.
An update, Max is sadly no longer with us. He made it to 13 years, and had a great life. We got a rescue dog, Buddy, who is almost two. Buddy is a black lab/husky mix. We’ve been trying and trying to get him to purposely press buttons. He walks on the board sometimes and accidentally presses buttons. He gets so excited sometimes, there’s no continuing, as he isn’t learning at that point. But he is getting closer. Many times he has grabbed my wife’s hand and pushed her hand towards the buttons! Haha. The last couple days he purposely stretched his paw out, like he was going to press a button, and he didn’t quite get there. Hopefully he will get it soon. Once he gets one button, I assume it will be easier to get him to understand other buttons. We use the button board every time we got for a walk, go outside, or give him a treat. One of these days, he will get it (I hope).
August 20, 2020 Update: We’ve had Buddy a little more than two months now. At this point, he’s hit the “treat” button about 4 times, with much encouragement from us. He lifts his paw up, then it would sort of seem to come down at random and hit the right button. He wasn’t really getting it. Today was a much more positive hit, my wife told him to go use the buttons, and he went and did a big stretch like usual. But instead of several minutes trying to get him to hit the button, he just reached his paw up, and hit right in the center of the “treat” button right off. Hopefully he will start getting it more, and hit it on his own. As he learns that, then he can start learning the other buttons. We have been using the “walk”, and “outside” buttons with him also.
Please comment if I didn’t describe something great, or if you have any questions. Also if you have any suggestions for software enhancements.
Answer Buzzers: https://amzn.to/2xOjO3Y
OR:
Parts Used for My Arduino Board Project:
Arduino Mega 2560: https://amzn.to/3dWozcv
60mm Dome buttons, set of five: https://amzn.to/2JK9OLH
AC Adapter, 5 volt: https://amzn.to/34aWb1z
Aux Cable for sound from MP3 board to amp: https://amzn.to/2xQC4tq
SDHC Memory card for mp3’s: https://amzn.to/3bS29ae
Two 3 watt speakers: https://amzn.to/2XbhoXQ
Serial MP3 player: https://amzn.to/2V0kfQJ
Stereo amp: https://amzn.to/2XdfCW7
Stereo amp volume knob: https://amzn.to/2x5ZACG
Header Set: https://amzn.to/39Je6xN
Hookup Wire (5 colors, 10m each): https://amzn.to/2UGnXQo
Female connector for power in: https://amzn.to/2UGp1E4
Black nylon M3 standoffs: https://amzn.to/2woizs3
Polyurathane finish: https://amzn.to/2RALBw3
Some of the above items come in multiples. You may be able to find single similar items in some cases, but since I do a lot of Arduino projects, I didn’t mind the multi-packs.
Tools
Solder Station: https://amzn.to/2xUSEIb
Solder 60/40: https://amzn.to/2kUICO2
Solder (lead free): https://amzn.to/2HBbtjy
Wire strippers: https://amzn.to/2Jtj3y5
Shrink Tubing: https://amzn.to/2LA1hKw
Hole Saw 2 1/4″ without arbor: https://amzn.to/2USbadZ
Hole Saw 2 1/4″ with arbor: https://amzn.to/3e39UvU
Above, if you already have a hole saw of a different size with a removable arbor, you can use the same arbor and save money by getting the hole saw without an arbor.


Steve, so sorry to hear about your dog’s passing. Thank you for posting this article and sharing your code. I’m working on this currently and wanted to mention/ask:
1) I think your schematic has the TX/RX lines swapped. I was able to figure it out by reading the comments in the code, which are correct.
2) The latest versions (after v1.3) of the mp3 library appear to have done away with the SERIALSOFTWARE functions. I needed to install v1.2.4 of the MD_YX5300 library and it worked great.
3) I’m a novice Arduino person, but I’m wondering what the limitations would be if I used a regular Uno instead of the Mega. Is it just fewer inputs (# of buttons) that I can ultimately use?
thanks again for your great work.
Shoot! You are correct. RX goes to TX, and TX goes to RX between the serial MP3 player and the Arduino. Thanks for catching that, I will update that schematic picture. The Uno can be used, it just has a lot less I/O pins on it. It still operates at 5 volts. That’s one thing you need to check, that the MP3 player, also can accept either 3.3 or 5 volts, so you should be good. What can get you is if you power the boards right, but one board expects 3.3 volts, and you send it 5 volts on a serial line, that can fry it, but you shouldn’t have that problem.
So far, my board is working great. Now if I can just get my new dog Buddy to figure out HE can press the buttons, he doesn’t need to get my wife so she can press them for him! What a knuckle head 😉 Anyway, I haven’t noticed anything I’d update yet in the software for the board, it is working great for me. Just be careful when you make your recordings to get an even volume level on each one. If you happen to think of a change in the software that would improve it, let me know.
Just getting started on the project. Thanks for posting it. For anyone’s future reference, the MD_YX5300 library needs to be version 1.2.3.