

I just got a used Stanley #7 plane from eBay, these planes are also known as jointer planes. With their long base, they can make a very straight edge in wood, or flatten a large piece of wood. In my case, I’ll be using it to flatten my work bench top. From my research, this is a Type 15 plane, made in either 1931 or 1932. Buying a used plane I think saved me some money. The newer Stanley planes aren’t rated high on Amazon, and have plastic handles. Some say they take a lot of work to flatten and get everything right, as Stanley isn’t producing a quality product any more. Apparently the older ones were better, so I decided to go that way. There are other very nice planes you can get from Lie Nielsen or a Veritas from Lee Valley Tools. The prices for those higher end planes are a lot more.
Both wooden handles seem in great shape. I’d say there was some rust that someone cleaned off. There were a couple areas on the bottom where a tiny lump of metal was protruding, and would scratch whatever I was smoothing. The blade had lots of small dings in it, and seemed to be sharpened at a very shallow angle.
Check my YouTube video above for more info, but I’ll go into some more details below.
To smooth the bottom, I pulled the blade out of the plane, so it wouldn’t be getting dinged up. I sat the plane on my jointer table, and the bottom seemed pretty flat already. To smooth it out though, where the rough metal was, I decided to sand that off on the jointer table. I didn’t want to scratch up the jointer table though, so I taped three sheets of sandpaper together, 220 grit. Then I realized that the tape under the sandpaper would be a bump, so I ended up putting masking tape all along the bottom of the sandpaper, avoiding any gaps, and more importantly, not overlapping the tape, even slightly. The idea was to keep the sandpaper very flat. I taped the end of the sandpaper to the jointer, and the edges just stuck out slightly on each side, I taped the sandpaper to the sides of the jointer table, and that easily held the paper still while I sanded.
I ran the plane back and forth over the sand paper for several minutes, and that did the trick. I didn’t want to go to a finer grit all along the jointer top, so ended up using a sanding block with 400 grit in it. Since I would just be trying to polish the bottom smoother, and not removing a lot of material, I think the sanding block and the finer sandpaper was OK. I did that for a minute or two, trying to make sure the bottom was nice and smooth.
I used a breathing mask while sanding the metal, that probably isn’t a good idea to be breathing that in.
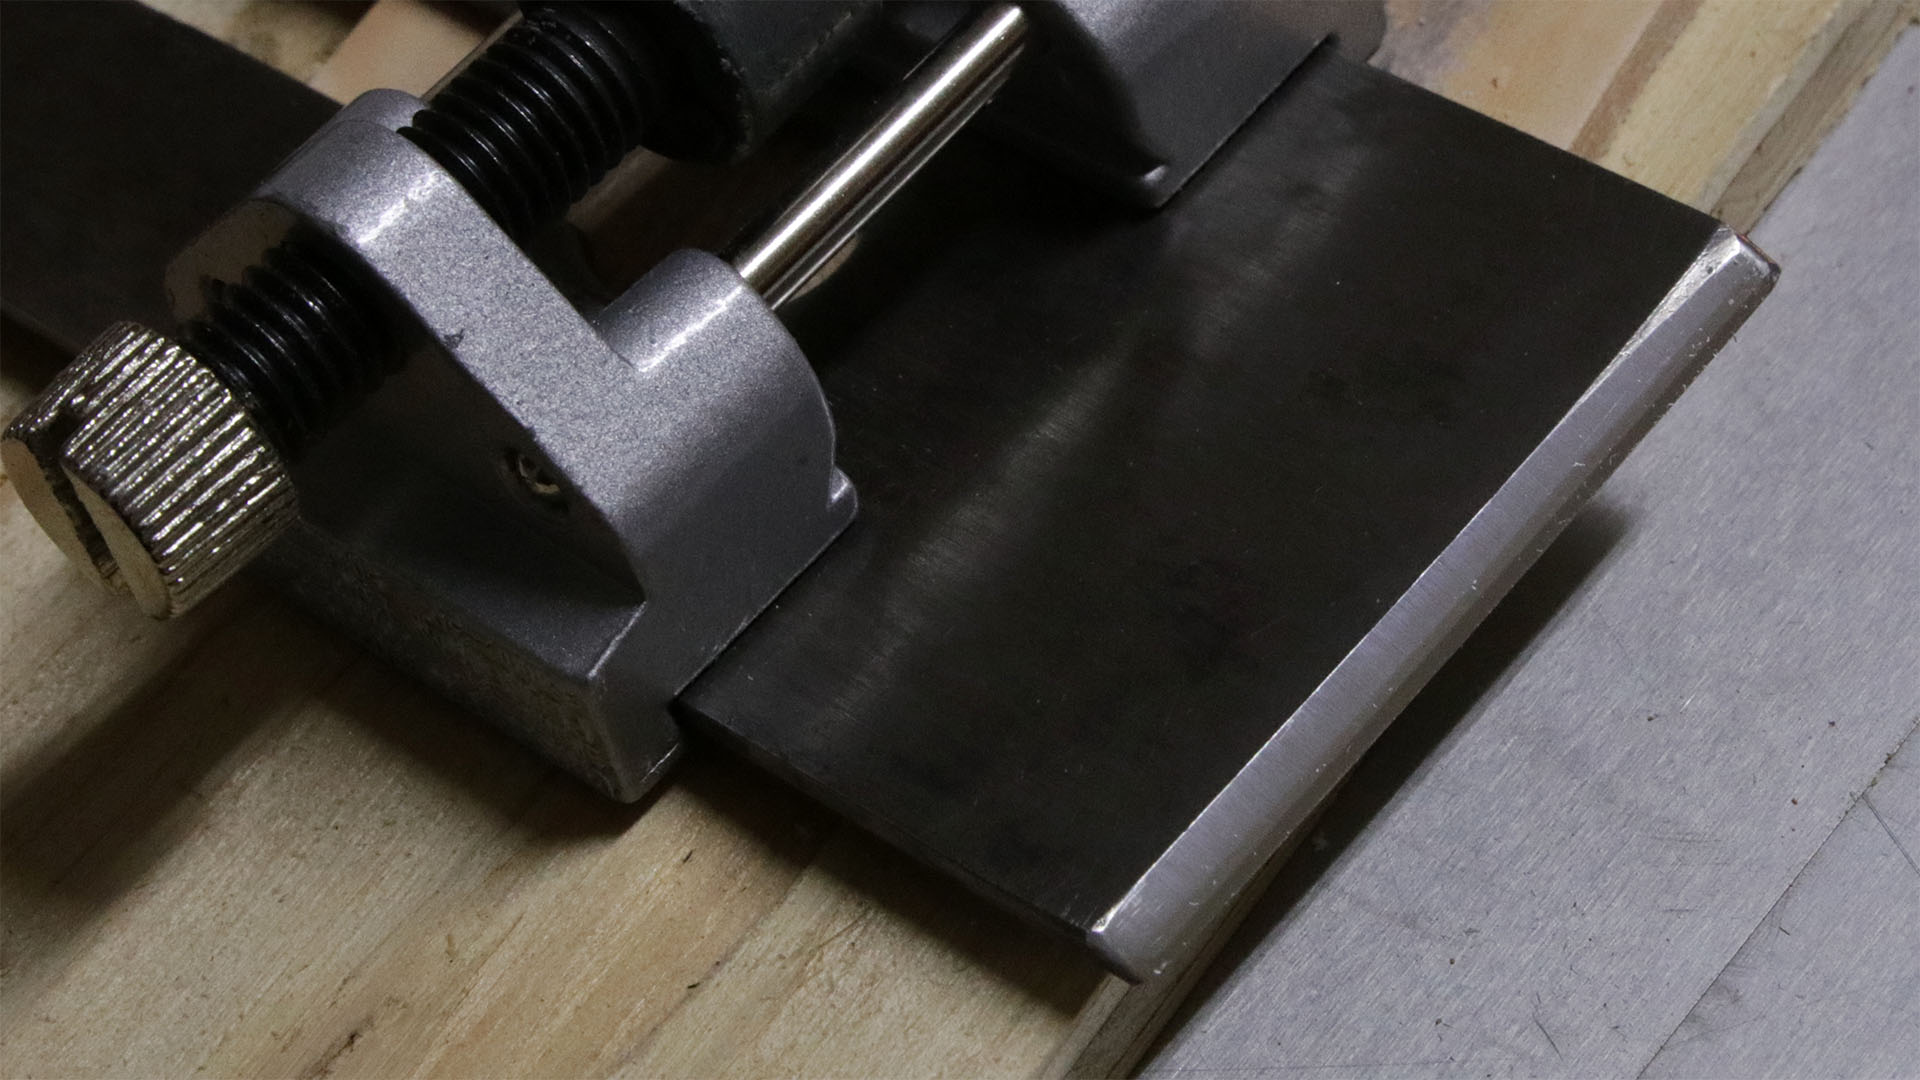
I’ll probably do a separate sharpening article soon. I sharpened the blade, getting the correct angle on it, 30 degrees. As you can see from the image, I ended up leaving a little of the old bevel on it, I hated to keep grinding more metal off to make it perfect, when I’d just be using the microbevel down on the edge. I put a 35 degree microbevel on the end, then used my leather strop to polish that edge. I also made sure the back of the blade had the burr removed. I also followed some directions from Paul Sellers to slightly round the edges of the blade. Otherwise a perfectly flat blade will just have a perfectly straight cut, and the edges of the cut will tear out. This ends up making lines in your surface, if you are trying to flatten a large piece of wood. The lines are 1 or 2 thousandths of an inch deep. You can especially see the rounded edge on the top right corner of the image below.
When using a leather strop, make sure and only pull the blade back towards you. Don’t push the blade, or you will cut into the leather. I only polished the microbevel, and didn’t bother to polish the main bevel.
One note on the sharpening angle. Paul Sellers says the exact angle doesn’t matter that much. Since the bevel is down anyway, what is hitting the wood is your blade mounted at a 45 degree angle in the plane. Some planes are ground with a 25 degree angle. I used 30 and 35 degrees because that’s how my Veritas blade came ground, and I’d made a jig to quickly mount the blade for those two angles to match the blade in my Veritas plane. I’ll show more of that in my sharpening video.
That’s basically it. I put the blade back in, adjusted the depth of it, and tested it out on my workbench top, which needs a bit more flattening. As I mentioned in the video, when adjusting the blade, if you turn the knob counter clockwise, it is pulling the blade back up. There is play in it adjustment. The last adjustment needs to be a clockwise turn, pushing the blade down, so more protrudes past the bottom of the plane. That way there is no slack in the blade adjustment, which would cause the blade to move back up when you try it out.
I’m just learning about hand planes, While I’m fairly comfortable on the setup that I mentioned above, actually using one is very new. I’ve found out it is a real workout! I had to mess with the blade adjustment a bit to get it to cut right. That was hard at first, but I quickly got the hang of that. Once adjusted, they cut pretty well. Make sure you are only taking a thin slice off. Most of the articles I read said you normally don’t take a lot of material off at once. The thicker you go, the more likely you will get tear out.
To flatten a workbench top, they say to go from one side at a 45 degree angle, and then from the other side at a 45 degree angle to flatten it. That seems to be going pretty good so far. When I glued up the work bench top, I made sure all the boards were aligned with the grain in one direction. So if you looked at the side of the board, see if you can spot a direction of the grain along what will be the top edge. If you follow a grain line, and it disappears than align all the boards that same way, to make it easier to plane. Some boards don’t have a grain direction that I could tell, the grain was very parallel to the cut, so it didn’t matter which way it went.
One issue I had, the plane was not cutting right at all. I took the blade out, and there were shavings in between the blade and the chip breaker. This can be caused by the chip breaker not being flat. One guy said he just pulls the chip breaker slight further away from the edge of the blade, and it quit doing it.
I just encountered a second issue. While planing, the wood was coming out of the center, and not the edges at all. This seemed strange. I wondered about the flatness of the blade, and placed it on my diamond plate, with a flashlight shining under it to help see any gap better. The blade had a very slight curve in it, causing it to just cut in the middle. If I deepened the cut, it would get out to the edges, but the center of the cuttings would be lots thicker than the edges. Paul Sellers mentioned you could do a one time adjustment, set it on a piece of wood, and hit the blade. I put a narrow piece of hardwood on top of the blade, with the blade sitting on a piece of wood which itself was on the cement slab. So while I used a regular hammer, the blade was never on the cement, and was never hit by the hammer directly. I had to beat on it pretty good, but got it lots straighter. It still isn’t perfectly flat, but the shavings coming out of the plane look a lot more normal now. I did have to resharpen the blade after this. I put some black permanent marker on the blade and did a light pass, and saw it was taking material out of the center of the blade.
You can help keep surfaces from rusting by using jojoba oil on them. Your blades, and the bottom of the plane. The idea is, don’t use very much, you want to put a little on a rag and wipe the blade or tool down, then get a clean rag and wipe any excess off. This should leave a very thin layer of oil on the tool to help it from rusting. It shouldn’t be so thick a layer that you are getting oil all over everything.
Just a note on sandpaper, I used to always buy packs at the big box stores, and the paper wore out very fast. I bought several large packs of Norton 3x sandpaper, and it really does seem to last a lot longer.
Used to help out (Amazon links):
Sanding block: http://amzn.to/2xgbmcJ
Sand paper 220 grit: http://amzn.to/2fS5VJA
Jojoba oil: http://amzn.to/2xSeevX