

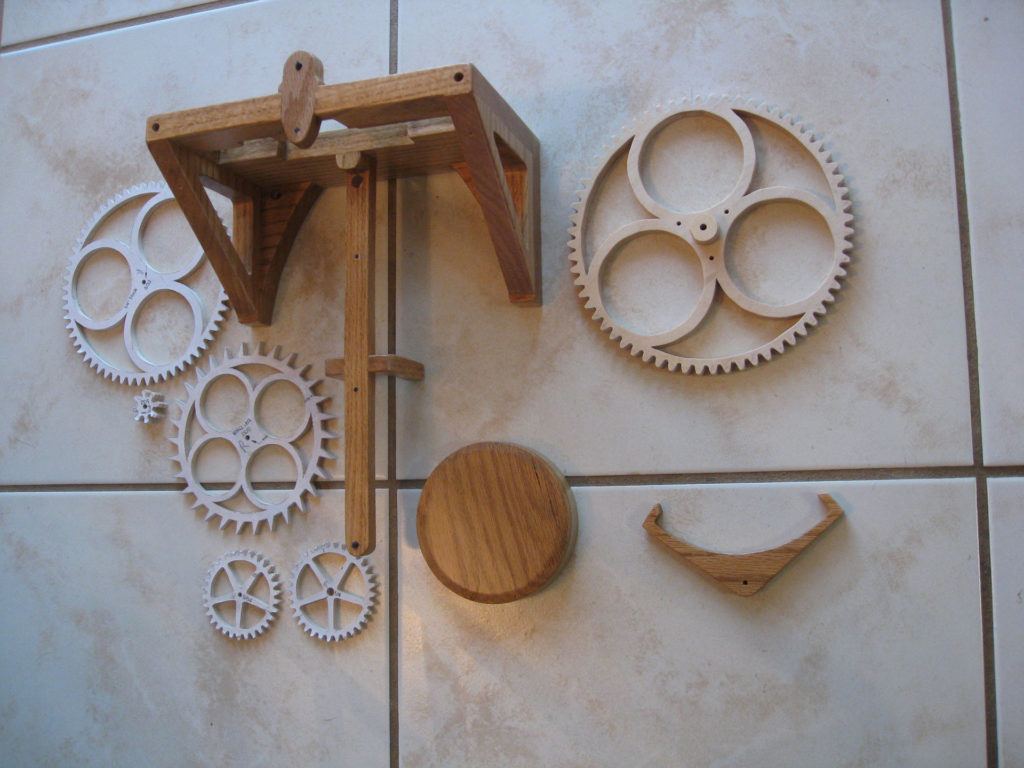
Several years ago, I built a wooden clock from plans from Clayton Boyer. I really liked Solaris, but decided I better start with Simplicity, which from its name, means it should be a bit simpler to build. I wasn’t sure I’d even be able to get it running, so thought I better start simple! It went rather well. I ordered the plans, then I just cut out the paper and glued them onto the wood. From there, it is basically cutting around the lines. I used oak and baltic birch plywood for the gears. I used a scroll saw to cut out the gears and a lot of the other parts. It worked pretty well, but I think a band saw works even better for the gear teeth. The gears aren’t really as difficult as you’d think to cut out.
I did make some copies of the plans and cut out several practice gears from cheap plywood before I tried my hand on one of the final gears from baltic birch. I did make a couple mistakes and had to make a couple pieces over, but for the most part, the clock came together fairly well.
Brass rods and tubing is used for the gears to run on, and for the minute and hour hands to turn. I took great care to polish these and used graphite on them to lessen friction. The more friction that can be removed, the less weight I’d need for the clock to run. Simplicity is wound once a day, by lifting the weight up. It runs very accurately, sometimes within a minute or two every couple weeks.
I tried to take great care when building it, doing the utmost very best job I could. I figured, why build this, if I just do a crappy job and it doesn’t look very good? Or doesn’t run? I think it turned out really nice, and I’m excited to build my next one, which will be Solaris. Solaris has quite larger gears, the main one is 14″ in diameter.
A lathe can be used for some of the parts, I didn’t have one then, but I do now, so it’ll be fun to see what I can use that for on the next clock. For example, I could have used a lathe to cut out the spool used to wind the line for the weights on. The instructions said I could do that, or just cut individual pieces out and glue together the spool, which worked out fine for me. The spool is used for the cord that the weights hang on, to wind up the cord. I used nylon squidding line for the weight cord.
Clayton makes many other really nice looking to crazy complicated wooden clock plans, of which I’ve already purchased several. It may take me many years, but I plan to build several of these. While the two YouTube videos for my current clock are on another channel, future clocks will be posted to my newer woodworking channel, subscribe so you don’t miss them.
Products used to put together the clock:
American grease stick graphite lubricant 1.13 oz/32g
Franklin International 5004 Titebond-2 Premium Wood Glue, 16-Ounce
Lead Shot Balls 7.5 bag 1 lbs (16 oz) (453 gm) (0.094″) (2.39 mm) Dia
Nylon Squidding Line #45 test (this is a large spool, maybe find a smaller spool)
Tools:
You will need a nice set of brad point drill bits, Lee Valley makes a nice set.
DEWALT DW788 1.3 Amp 20-Inch Variable-Speed Scroll Saw
A band saw is great for the gear teeth: Grizzly G0555X 1434; Extreme Series Bandsaw